Urban Poles/Nordic Walking
Bâtons urbains pour le fitness
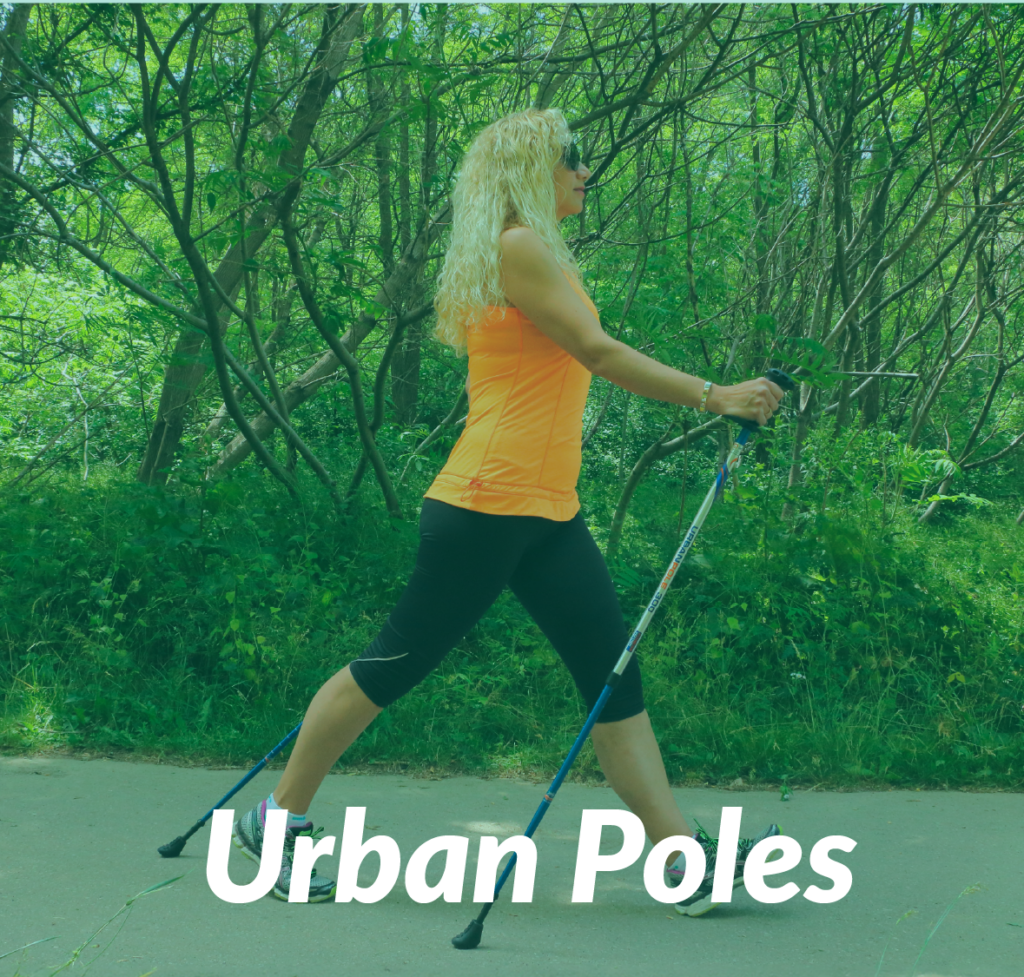
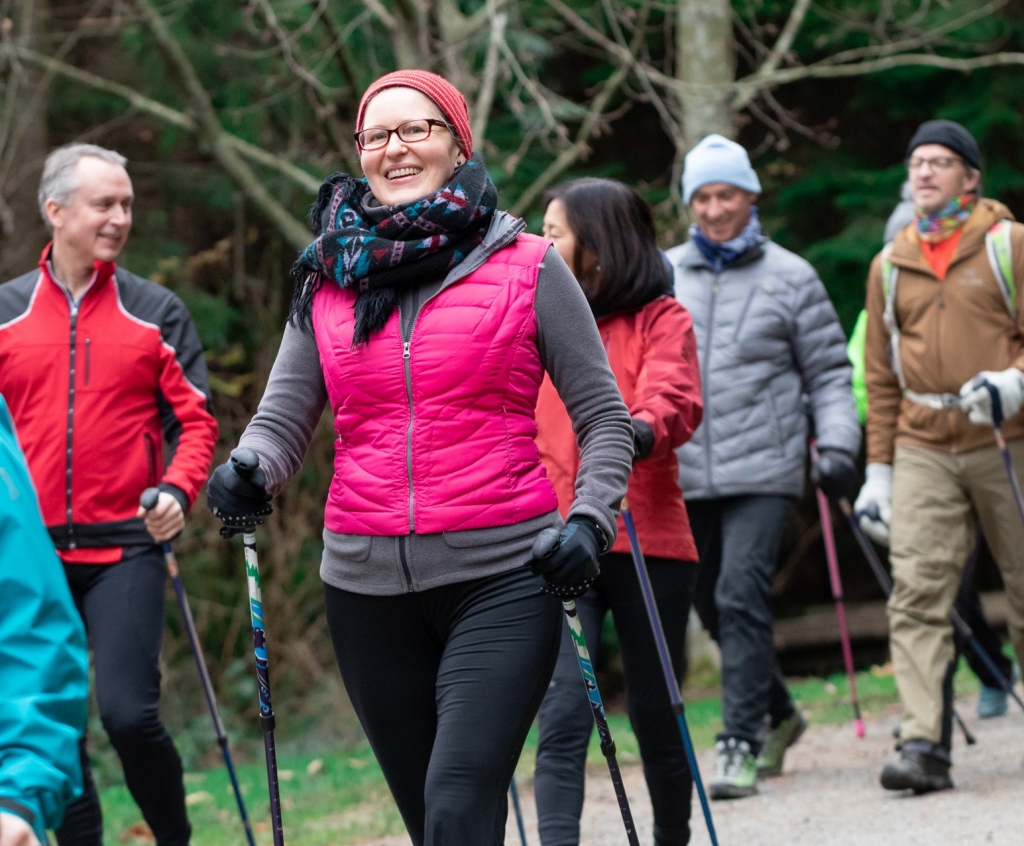
Looking for a more intense workout over regular walking?
The choice is easy: same quality, design and features, all you need to decide on is your colour preference and graphics. Spirit Poles have the distinguishing features of a twist and flip locking system, and snow baskets are included.
Our Urban poles for fitness burn more calories, tone your core while taking pressure off your lower joints. Versatile for indoor and outdoor use including hiking, winter walking & snowshoeing.
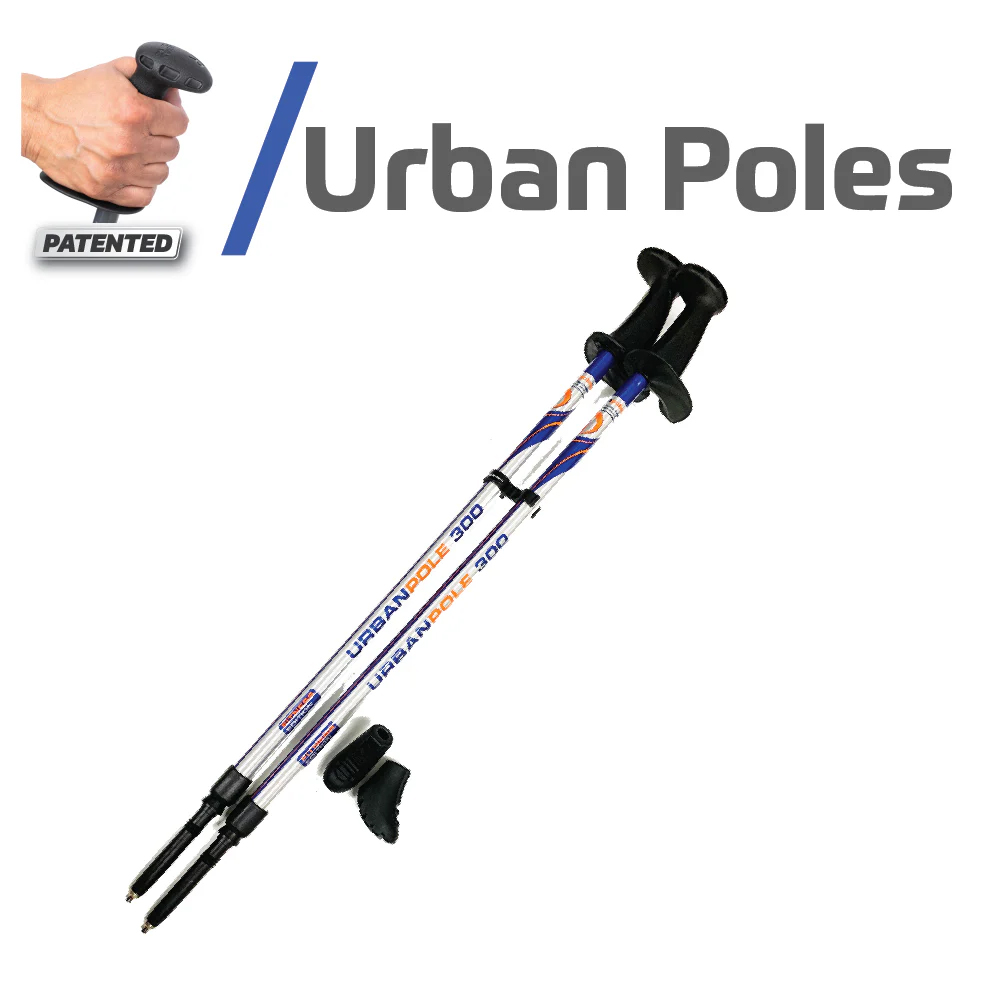
Urban Poles Series 300
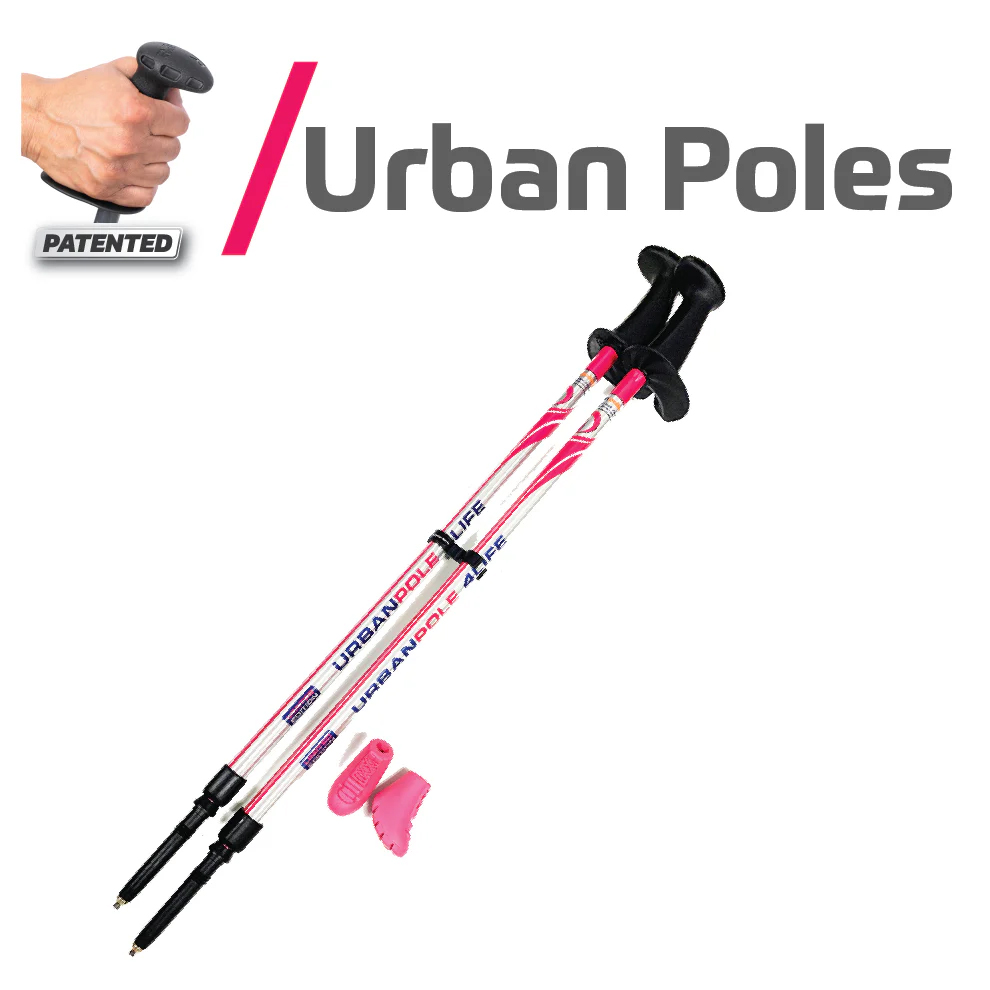
Urban Poles 4Life
Urban Poles Spirit
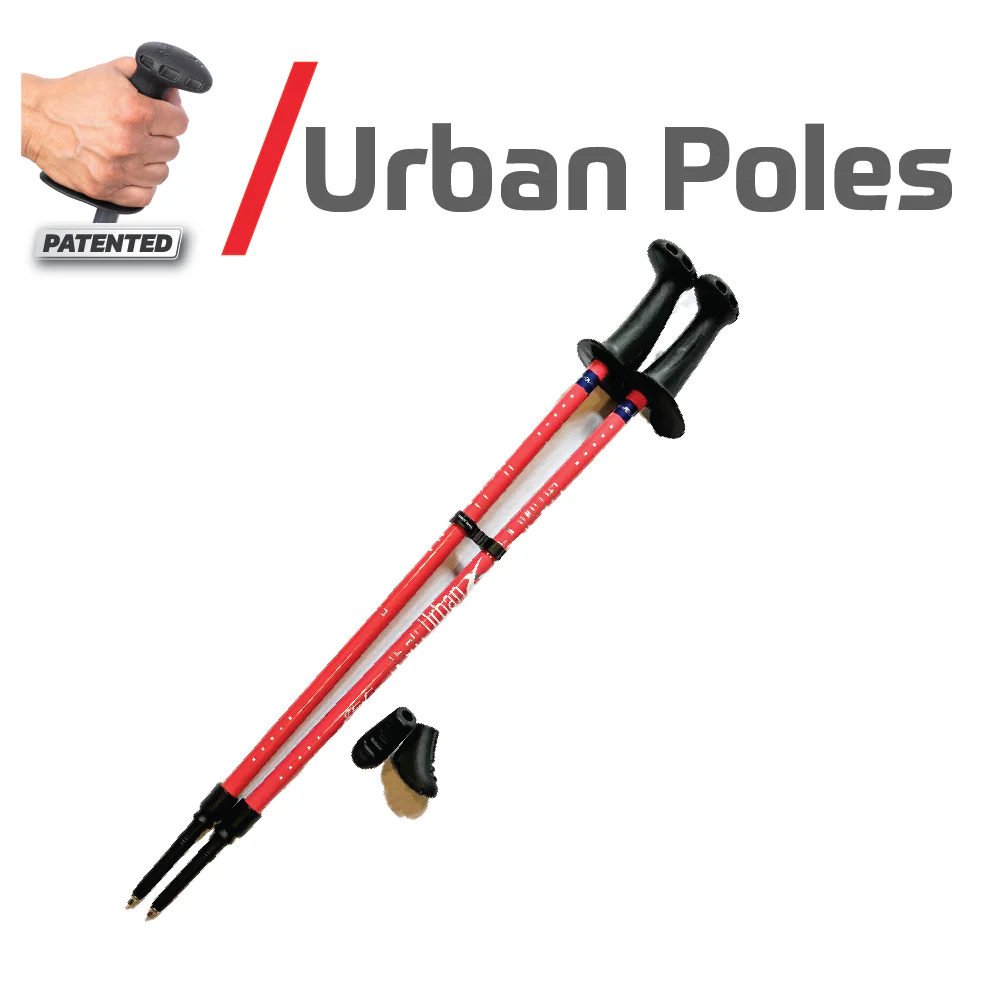
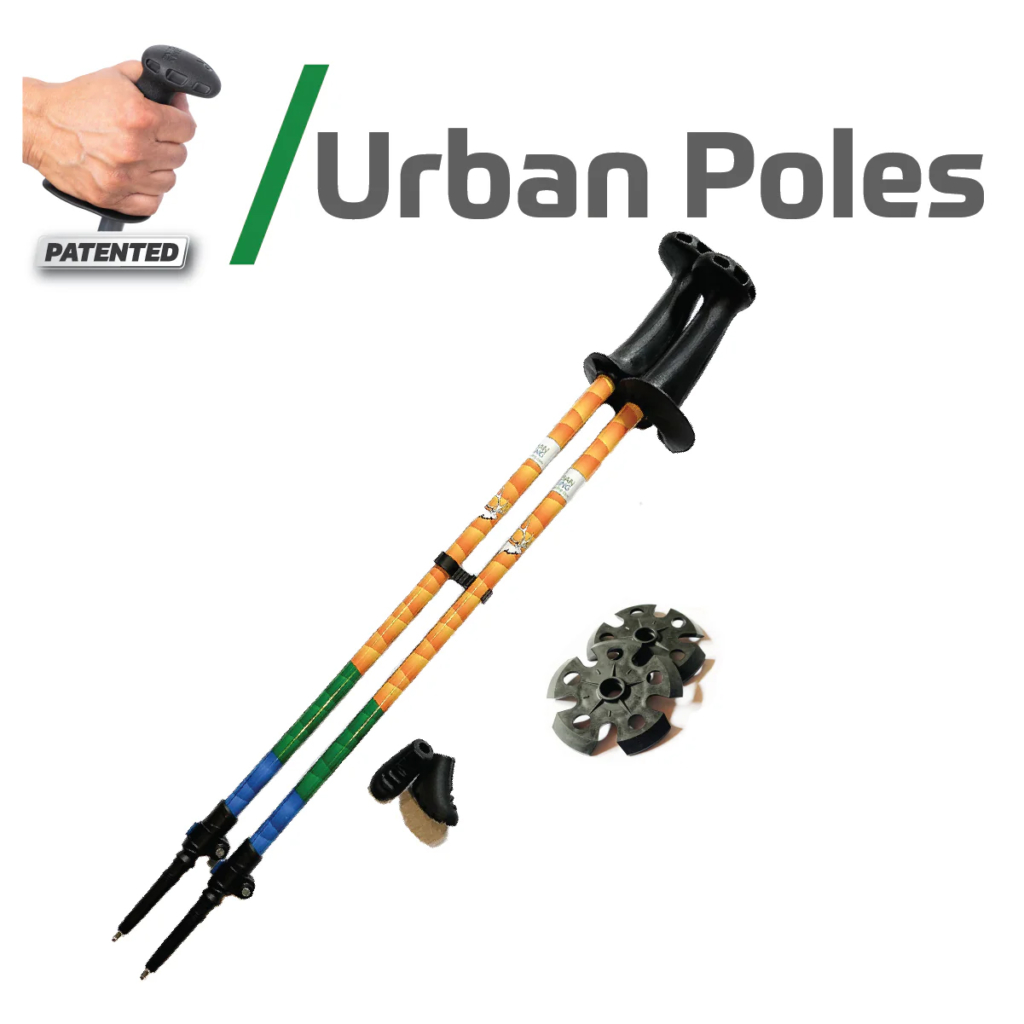
Urban Poles Urban X
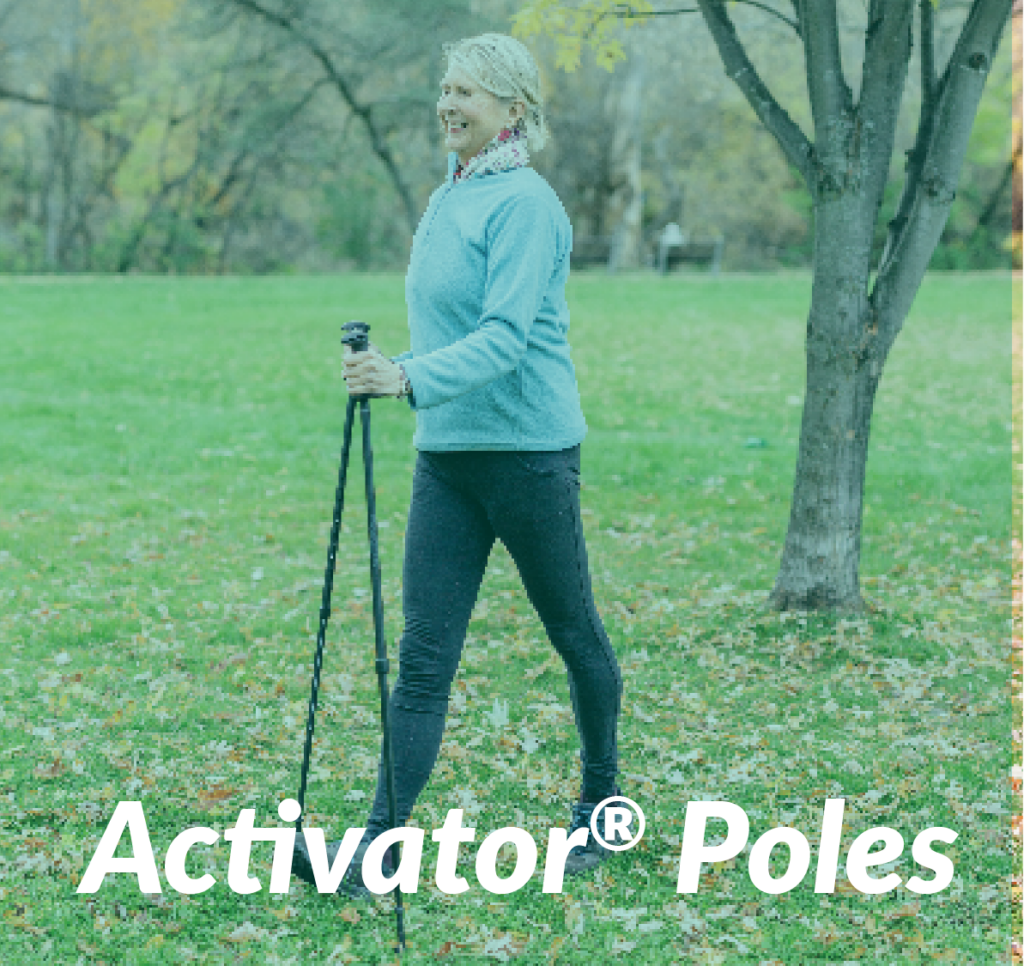
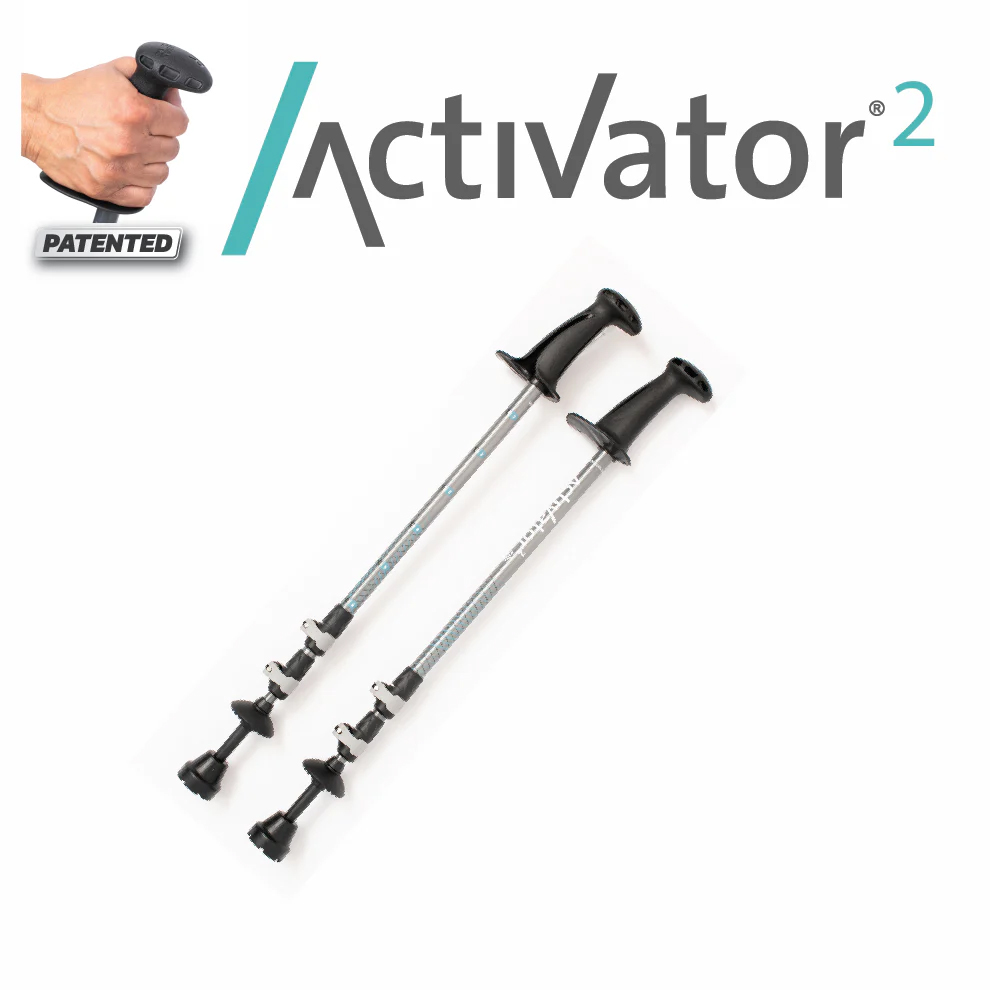
Activator® Poles - Balance and Rehab
ACTIVATOR® Poles for Balance, Hip & Knee Joints with Osteoarthritis and Rehab
The choice is easy: same quality, design and features, all you need to decide on is your colour preference. Just a note that the Moda poles include snow and hiking baskets while the Activator2s distinguishing features are that they can accommodate taller and/or heavier users and collapse to a shorter length.
Convient pour :
- Hip and knee osteoarthritis
- Pre and post hip & knee replacement surgery
- Post spinal stenosis surgery
- Conditions that affect your balance: Parkinson’s, MS, Stroke
- Rehabilitation programs
- Older Adults Programs – Minimizing the Risk for Falls
Ask your doctor or rehab professional if ACTIVATOR® Poles are for you!
Activator® Poles - regular two sectional
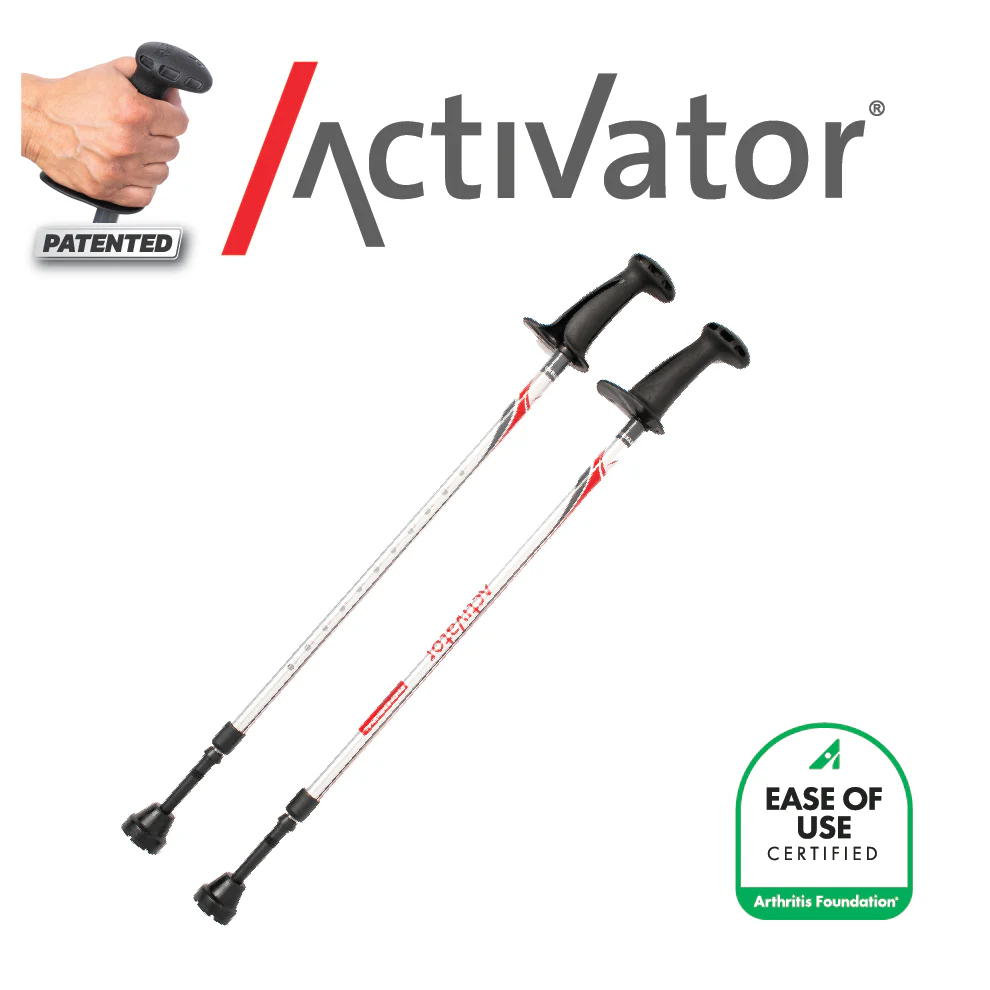
Activator Poles (Silver-Red)

Activator Evening Black
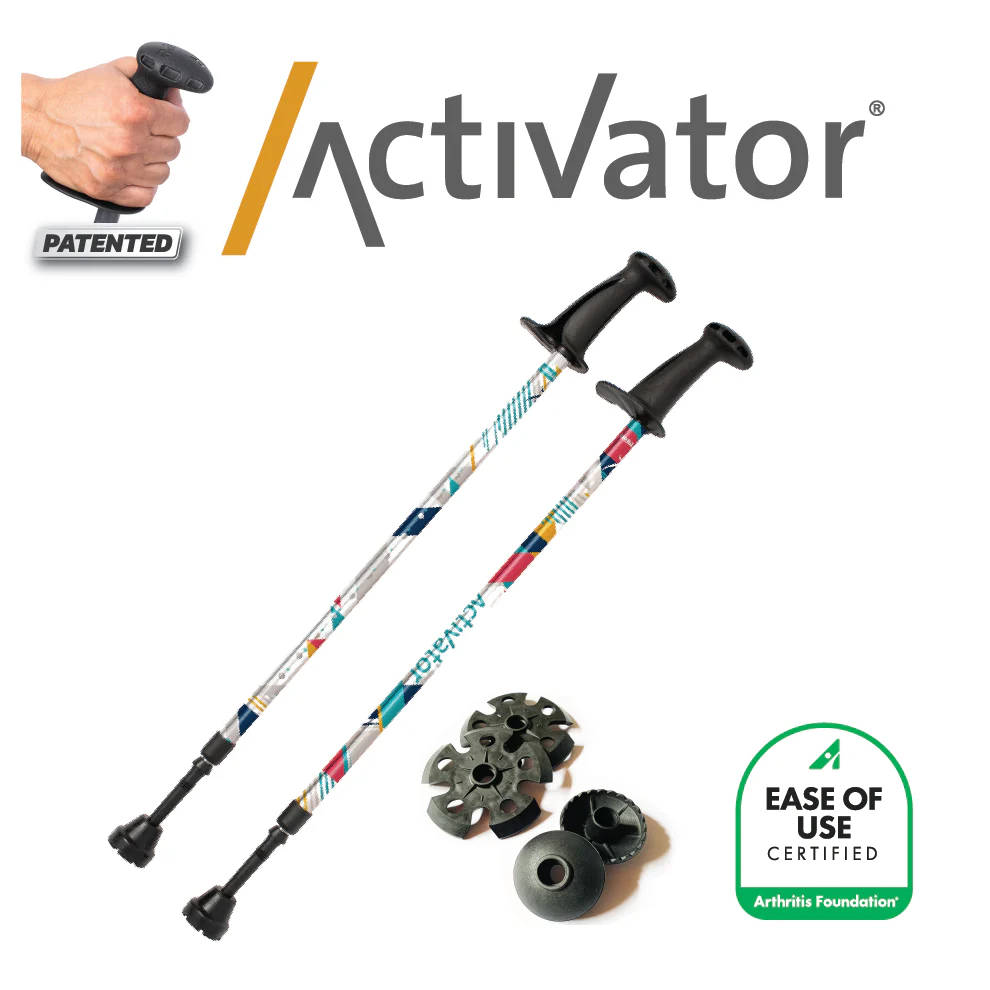
Activator Moda
Unique Components of the ACTIVATOR® Poles:
- Button-Locking System: An easier and safer method than twist locking systems. Up to 200 lbs (90 kg) of weight bearing capacity per pole. Maximum suggested user weight: 250 lbs (113 kg)
- New – Ergonomic CoreGrip (patented): Designed for improving core strengthening while providing greater comfort and supporting the wrist in a neutral position to reduce strain.
- Wide Ledge instead of a Strap: To reduce the risk of injuries. A study by Knobloch et al. (2006) found the highest rate of injury for Nordic walking is when the person is still attached to the poles during a fall.
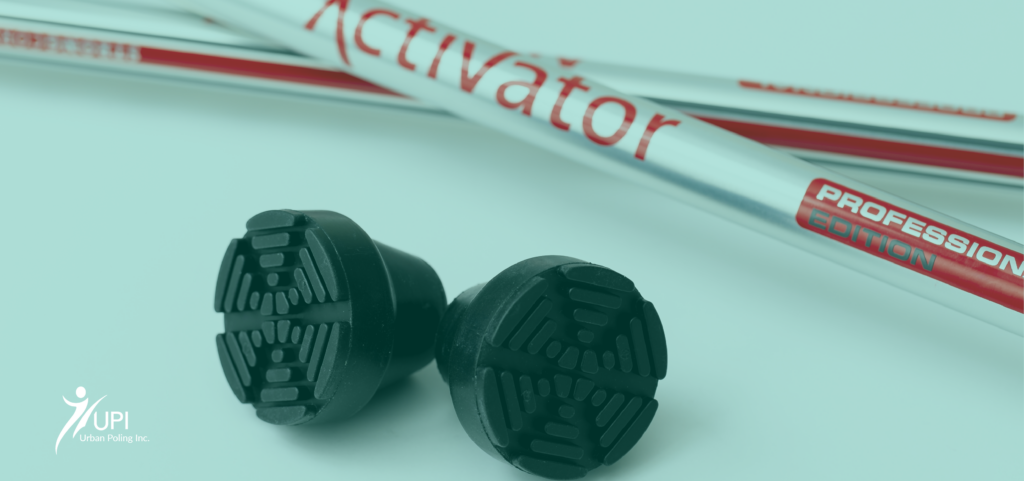
- Bell Shaped Tips: Provide greater stability than boot shaped tips
- 3 Anti-Vibration Features: The handle, ferrule and bell tips help reduce vibration and minimize impact on joints
- Carbide Steel Tip: Provides stability on soft or uneven surfaces such as sand, snow, grass, trails and gravel.
- Telescoping: For users from 4′2” to 6′ (127 to 182 cm). Collapse to 29 inches (73 cm) for storage & travel.
Activator® Poles 2 - special three sectional
Activator 2 Poles
have the same features as above with these differences:
- Button and flip-lock locking system: Up to 225 lbs (102 kg) of weight bearing capacity per pole. Maximum suggested user weight of 320 lbs (145 kg)
- Telescoping: For users from 4′2” to 6′4” (127 to 193 cm). Collapse to 25” (63 cm) for storage & travel
Activator 2 (3 sectional)
Instructions relatives à l'Activator
Comment configurer les pôles Activator®?
Comment faire la technique Activator
Activator Technique
- Step 1: Take hold of your poles
Make sure that the CoreGrip (handle) with the letter “R” is in your right hand and the pole CoreGrip with the letter “L” is in your left hand. Hold onto your poles with an easy grip, making sure your hands go all the way around the CoreGrip.
Stand tall and place your elbows at your sides at a 90-degree angle. Ensure the poles are always completely vertical. Keep your elbows bent the entire time you are walking. - Step 2: Begin walking
Step forward with the poles and walk in the same manner as regular walking: swing your right arm forward (with your elbow bent at 90 degrees) as your left foot steps forward. Keep the poles vertical and in front of your body at all times. Be sure that your upper arms swing forward and backward from the shoulders (not elbows) like pendulums. - Étape 3 : Vérifiez votre posture et votre prise en main
Ne serrez pas les poignées trop fort. Au lieu de cela, appuyez sur la corniche avec le bord extérieur de votre main pour engager le haut de votre corps et les muscles du tronc et pour améliorer votre stabilité et votre équilibre. Une décharge significative du poids sur les bâtons ne se produira que si vous appliquez une force vers le bas sur la corniche.Important: This technique was developed in conjunction with the specific features of the ACTIVATOR poles. A study by Bechard (2015 unpublished) at UWO found significant off-loading for the knee joint when using the Activator technique.
Conseils rapides
- Adapt your poles to different terrains & winter! Hidden beneath the rubber boot tip of each pole is a sharp carbide steel tip, which provides increased stability on wet and uneven terrain, such as grass, trails, gravel, sand and snow. This feature allows you to stay active all year round and is an excellent tool for helping to prevent falls in the winter time. You can also purchase snow baskets to keep the poles from sinking into the snow while winter walking or snowshoeing. To attach the baskets, take off the rubber tip and push the basket to the 3 grooves and then rotate the baskets until you achieve a tight fit.
- Using your ACTIVATOR Poles on your travels Collapse your ACTIVATOR Poles to their shortest length 29″ (79 cm) or 25″ (63 cm) for the ACTIVATOR2. They generally will fit in a medium size suitcase by placing them on a diagonal. Durable Urban Poling carrying bags are available to protect poles while in storage and in transit and makes it easy to take your poles with you. You can also use the carrying bag instead of a purse. Take the rubber tip off to expose the carbide tip for walking on trails, beaches and hikes.
- Replace your tips periodicallyYour ACTIVATOR poles come with a high-grade rubber tip for stability, off loading & reduced vibration. Replace your bell shaped tips when the treads wear out, or roughly once a year with regular use.
- Gradually Increase your time
Start by using your poles for only 1/3 of your maximum walking time and gradually increase your distance/time. - Take care of your poles
Store your poles in a dry, moderate-temperature location. You can also purchase a carrying bag for travel or storage.
Lisez attentivement le guide de l'utilisateur et les précautions énumérées avant d'utiliser vos bâtons ACTIVATOR (le guide est fourni avec vos bâtons).
Poteaux ACTIVATOR
Did you know that there are 19 current/recent studies on the ACTIVATOR® Poles at hospitals and universities across Canada and at the renowned Royal National Orthopedic Hospital in the UK? Benefits may include improved core strength, posture, balance, improved confidence for walking; reduced impact on hips and knees and increased endurance! Health Care Professionals are recommending the ACTIVATOR® Poles for rehab and many conditions because they were designed by an Occupational Therapist & Gerontologist and have eight unique features for increasing safety, performance and stability. We hope you enjoy the ACTIVATOR Poles that have been built for walking and active living!
Unique Components of the ACTIVATOR® Poles:
- Button-Locking System: An easier and safer method vs turning locking systems. 200 lbs (90 kg) of weight bearing capacity per pole. Maximum suggested weight of user: 250 lbs (113 kg)
- New – Ergonomic CoreGrip (patented): Designed for improving core strengthening while providing greater comfort and supporting the wrist in a neutral position to reduce strain.
- Wide Ledge instead of a Strap: To reduce the risk of injuries. A study by Knobloch et al. (2006) found the highest rate of injury for Nordic walking is when the person is still attached to the poles during a fall.
- Bell Shaped Tips: Provide greater stability than boot shaped tip
- 3 Anti-Vibration Features: Reduce vibration and impact on joints
- Carbide Steel Tip: Provides stability on slippery conditions and on trails & beaches.
Telescoping: 4′ to 6′ (121 to 182 cm). Poles are collapsible for storage & travel - New – ACTIVATOR2 Poles designed for taller individuals up to 6′ 4″ (195 cm) and collapses shorter for travel 25″ (63 cm). Maximum user weight: 325 lbs (147 kg).
Réglage des perches ACTIVATOR
- Lorsque vous recevrez vos bâtons pour la première fois, vous devrez les ajuster à votre taille.
- Step 1: Stand tall with your poles upright and relax your arms so that your elbows rest at a 90-degree angle. This is the correct pole length for your height.
- Step 2: Notice the perforated holes on the top portion of the pole. Pull the bottom portion of the pole downward and turn it until the silver stripe lines up with the holes. Continue to pull down on the lower part of the pole until the button pops into the correct hole for your height. You may need to adjust the pole slightly up or down before the button locks securely into place.
Réglage des perches de l'ACTIVATOR® 2
- Extend poles: Open both flip-locks tabs (grey). Pull below flip-lock to extend the middle and lower sections. Lower section may be stiff to pull initially.
- Set pole length: Adjust the pole length so that you can stand with your elbow bent at slightly less than a 90 degree angle with your hand resting on the ledge of the CoreGrip and the bell tip resting on the ground.
- Secure button lock A-B: Looking at holes A and B in the middle section, turn the lower section of the pole until you see the white stripe in the holes marked A and B. Pull on the lower section of the pole until the button locks into hole A or B.
- Secure button lock 1-6: Repeat above securing the button lock in one of the holes marked 1-6 (depending on appropriate level for your height) in the upper section. Confirm pole length and close flip-lock tabs. Collapsing: open the flip-lock tab, push the button lock and at the same time push in the section Close flip-lock tab.
Comment régler votre Activator® 2
Précautions :
Consultez votre professionnel de la santé (médecin, thérapeute ou autre) avant d'utiliser les bâtons si vous utilisez actuellement une canne, des béquilles ou un déambulateur ; pour l'entraînement ; ou si vous souffrez d'un problème médical qui affecte votre équilibre, votre stabilité, votre capacité à saisir les poignées, votre vision, votre perception de la profondeur ou votre coordination ; ou si vous vous remettez actuellement d'une blessure ou d'une opération chirurgicale.
- DO NOT use the ACTIVATOR Poles on stairs unless trained by a therapist or other health care professional.
- ACTIVATOR Poles should not be used on ice.
Always use both poles (except for people with strokes), unless advised otherwise by your healthcare professional. - ACTIVATOR Poles may help to prevent or break a fall, but falling on them may affect pole integrity. Do not use poles that have been fallen on or that have been damaged in any other way.
- Replace your poles approximately every 2 years if you are over 200 lbs (90 kg) or a heavier user. Use exceeds more than 5-10 km per week.
- Ask your therapist how to use the poles for transferring out of the car and use both poles.
Introduction à la police urbaine
Curieux de savoir comment s'entraîner avec un bâton de marche ? La marche urbaine (aussi connue sous le nom de marche nordique) - pensez au ski de fond sans les skis - a des effets tonifiants, brûle-calories et améliore la posture, ce qui l'a rendue populaire en Europe depuis des décennies et en a fait un nouvel exercice favori au Canada. Il suffit de prendre ses bâtons et de partir. Pas besoin d'une tenue en spandex coûteuse ou d'un abonnement à un centre de conditionnement physique !
Voici 10 raisons supplémentaires d'essayer le poling urbain.
- 1. Il affine votre taille - Vos abdominaux se contractent chaque fois que vous poussez sur vos bâtons. Cela équivaut à 1 000 contractions abdominales par kilomètre ou 1 800 par mile !
- 2. Vos genoux et vos hanches vous remercieront - Les bâtons vous permettent de transférer le poids de vos hanches et de vos genoux vers le haut de votre corps. Vous pouvez marcher plus loin, plus vite ou même sans douleur.
- 3. Il accélère la combustion des calories - La recherche le prouve encore et encore : le poling urbain brûle jusqu'à 20 à 46% de calories en plus que la marche normale. Ouah !
- 4. Il sculpte vos bras et vos épaules - Le poling urbain sollicite 75 % de vos muscles, en particulier les muscles du haut du corps qui sont sous-utilisés. Bonjour les manches courtes !
- 5. Il aide à équilibrer votre glycémie - L'entraînement complet de poling urbain aide à maintenir la glycémie dans une fourchette saine.
- 6. Vous vous redresserez et vous vous sentirez plus confiant - Les muscles du haut du dos (ceux qui tirent les épaules vers l'arrière) se contractent chaque fois que vous plantez vos bâtons et que vous appuyez sur les poignées ergonomiques.
- 7. C'est un entraînement social amusant - Invitez vos amis, vos parents et vos enfants à profiter avec vous de tous les bienfaits pour la santé.
- 8. C'est un formidable anti-stress - L'action rythmique douce permet de se distraire des soucis quotidiens et de remonter le moral.
- 9. Vous pouvez régler l'intensité - Le poling urbain est une activité énergisante qui peut être pratiquée par des personnes de tout âge et de toute capacité athlétique. Il suffit d'appuyer sur les poignées ergonomiques avec plus ou moins d'intensité pour modifier votre rythme.
- 10. C'est une excellente alternative à la course à pied - Parcourez les sentiers ou les trottoirs de votre quartier, seul ou avec une bande d'amis. Le poling urbain offre la même expérience d'air frais que la course à pied, tout au long de l'année, mais sans heurter ni bousculer vos articulations.
Comment installer vos poteaux urbains
Série 300, 4Life et UrbanX.
Comment appliquer la technique de la police urbaine
Poteaux de la série 300, 4Life, UrbanX et Spirit
Ajustement des pôles
Lorsque vous recevrez vos bâtons pour la première fois, vous devrez les ajuster à votre taille. Les bâtons sont dotés d'un système de verrouillage interne qui peut supporter jusqu'à 41 kg de pression directe par bâton. Poids maximum suggéré pour l'utilisateur : 225 lbs (102 kg). La section inférieure des bâtons comporte des marques allant de 4′-2" à 6′-2″ (128 à 189 cm). Si vous êtes novice, vous trouverez peut-être plus facile de commencer avec des bâtons dont la hauteur est inférieure de 5 cm à votre taille.
Étape 1 : Repérez les mots "lock/unlock" (verrouiller/déverrouiller) sur la partie inférieure de votre poteau. Placez votre main gauche sur la partie supérieure de la perche et votre main droite près de la partie inférieure de la perche. Tournez uniquement la partie inférieure en position "déverrouillée". Ne touchez PAS la virole en plastique noir située au milieu de la canne - il s'agit d'un dispositif anti-vibration.
Étape 2 : Après avoir ajusté le mât à votre hauteur, resserrez-le en tournant uniquement la partie inférieure du mât vers la position "verrouillage". Assurez-vous toujours que vos perches sont bien verrouillées avant de les utiliser. Ne tirez jamais sur les perches et ne les verrouillez jamais au-delà des mots "Max" ou "Stop".
Étape 3 : Assurez-vous que le "bout" de la botte est tourné vers l'arrière ou dans la direction opposée à celle dans laquelle vous marchez.
Comment installer vos mâts spirituels
Comment ajouter des paniers à neige à vos poteaux urbains
Technique de la police urbaine
Avant de commencer, veillez à régler la longueur de la perche à la bonne hauteur.
Étape 1 : Observez comment vous marchez naturellement
Faites quelques pas en avant sans vos bâtons (ou en les tenant par le milieu) et balancez vos bras comme vous le feriez normalement en marchant. Remarquez que votre bras avance naturellement en même temps que la jambe opposée.
Étape 2 : Faites glisser vos poteaux
Saisissez vos bâtons, en veillant à ce que la CoreGrip portant la lettre "R" soit dans votre main droite et la CoreGrip portant la lettre "L" dans votre main gauche. Saisissez les poignées des bâtons sans les serrer, les bras complètement détendus le long du corps. Les bras le long du corps et en traînant les bâtons derrière vous, commencez simplement à marcher. Sentez vos bras se balancer naturellement devant puis derrière votre corps à chaque foulée.
Étape 3 : Balancez votre bras dans la position de la poignée de main.
Tout en continuant à marcher et à traîner vos bâtons, commencez à balancer vos bras vers l'avant jusqu'à ce qu'ils soient au même niveau que si vous donniez une poignée de main haute. Si cela vous semble difficile, réduisez la longueur de vos bâtons. À ce stade, vous devriez sentir les pointes des bâtons toucher le sol derrière vous à chaque pas.
Étape 4 : Appuyer et pousser
En plantant les bâtons, exercez une pression vers le bas sur le rebord du CoreGrip et sentez votre corps propulsé vers l'avant par les bâtons. Enfin, lorsque votre bras se balance vers l'avant jusqu'à la position de la poignée de main haute, soulevez-le légèrement pour que vos bâtons quittent le sol.
Poursuivre la police urbaine tout au long de l'année !
Profitez de vos bâtons Urban tout au long de l'année pour la marche hivernale et les raquettes à neige ! Vous pouvez également acheter des paniers pour les bâtons Series 300, 4Life ou Spirit et les bâtons ACTIVATOR : des paniers à neige pour la marche hivernale et des paniers de trekking pour la randonnée.
Partie 1 : Les bases
Conseils rapides
Saisir légèrement les poignées
Les poignées ergonomiques CoreGrip sont conçues pour être tenues légèrement. Essayez toujours de maintenir une prise détendue (avec vos doigts tout autour des poignées) afin de réduire les tensions inutiles dans vos mains. L'exercice consiste à pousser le rebord du CoreGrip vers le bas tout en balançant le bras vers l'arrière afin d'engager les muscles du tronc.
Adaptez vos bâtons à différents terrains
Sous la botte en caoutchouc de chaque bâton se cache une pointe en acier au carbure, qui améliore la stabilité sur les terrains humides et irréguliers, tels que l'herbe, le gravier, le sable et la neige. Il s'agit d'un outil idéal pour prévenir les chutes en hiver.
Remplacez périodiquement vos pointes
Vos bâtons de fitness Urban Poling sont équipés d'un embout en caoutchouc de haute qualité pour une meilleure traction, une vitesse accrue et une réduction des vibrations. Remplacez vos embouts lorsque les bandes de roulement s'usent, soit environ tous les six mois ou tous les ans, en fonction de la fréquence d'utilisation.
Utilisation des bâtons par grand froid
Si vous utilisez les perches par des températures inférieures à zéro, placez-les à l'extérieur pendant 10 à 15 minutes pour qu'elles s'adaptent à la température. Ensuite, bloquez-les à la hauteur souhaitée.
Astuce pour débloquer les poteaux
Les bâtons sont dotés d'un excellent système de verrouillage, mais les nouveaux bâtons peuvent être difficiles à déverrouiller les premières fois. Essayez ceci : Retournez les bâtons et tenez fermement la poignée entre vos pieds. Puis, à l'aide de vos deux mains, tournez la partie inférieure brusquement dans le sens du "déverrouillage".
Prenez soin de vos poteaux
Conservez vos bâtons dans un endroit sec et à température modérée. N'utilisez jamais de lubrifiant. Vous pouvez également acheter notre sac de transport unique et élégant pour le voyage et le stockage.
Précautions:
Consultez votre médecin ou thérapeute avant d'utiliser les bâtons si vous utilisez actuellement une canne ou un déambulateur, si vous souffrez d'un problème médical qui affecte votre équilibre, votre stabilité, votre force de préhension, votre vision, votre perception de la profondeur, votre jugement ou votre coordination, ou si vous vous remettez d'une blessure ou d'une intervention chirurgicale.