1-877-499-7999
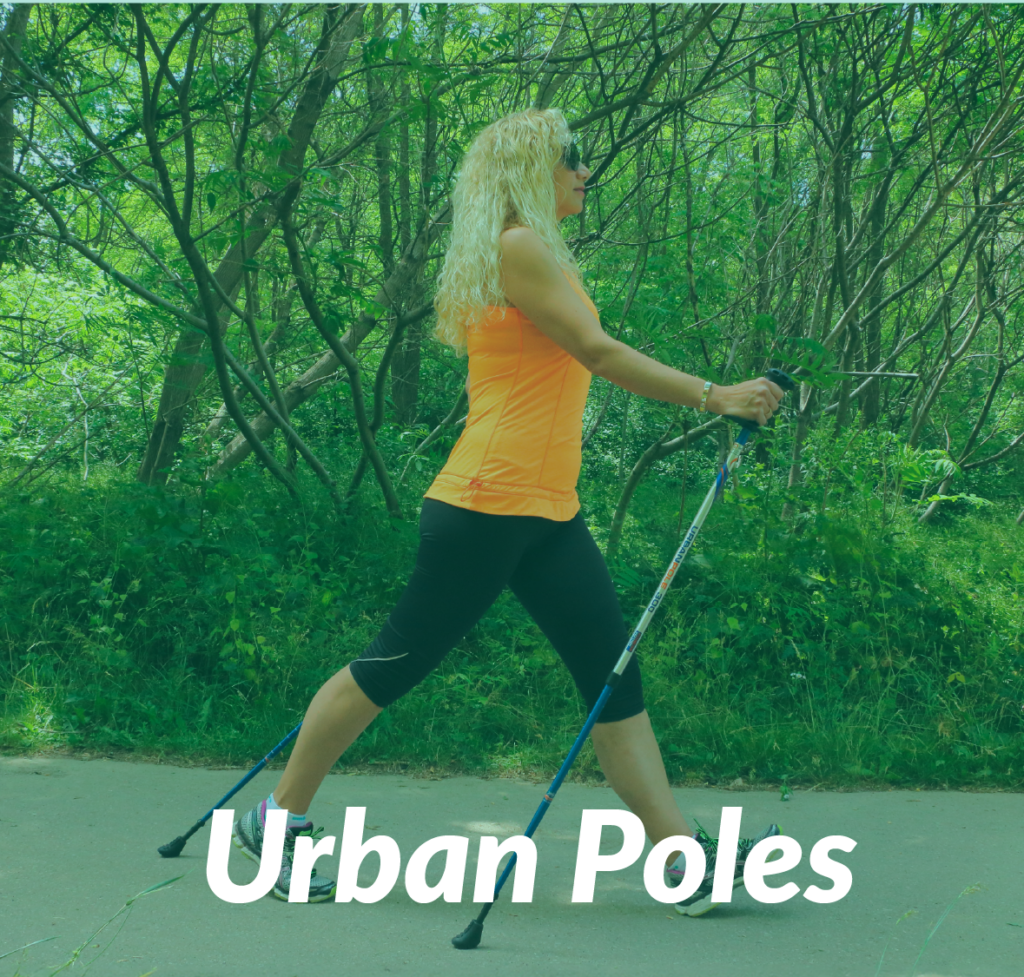
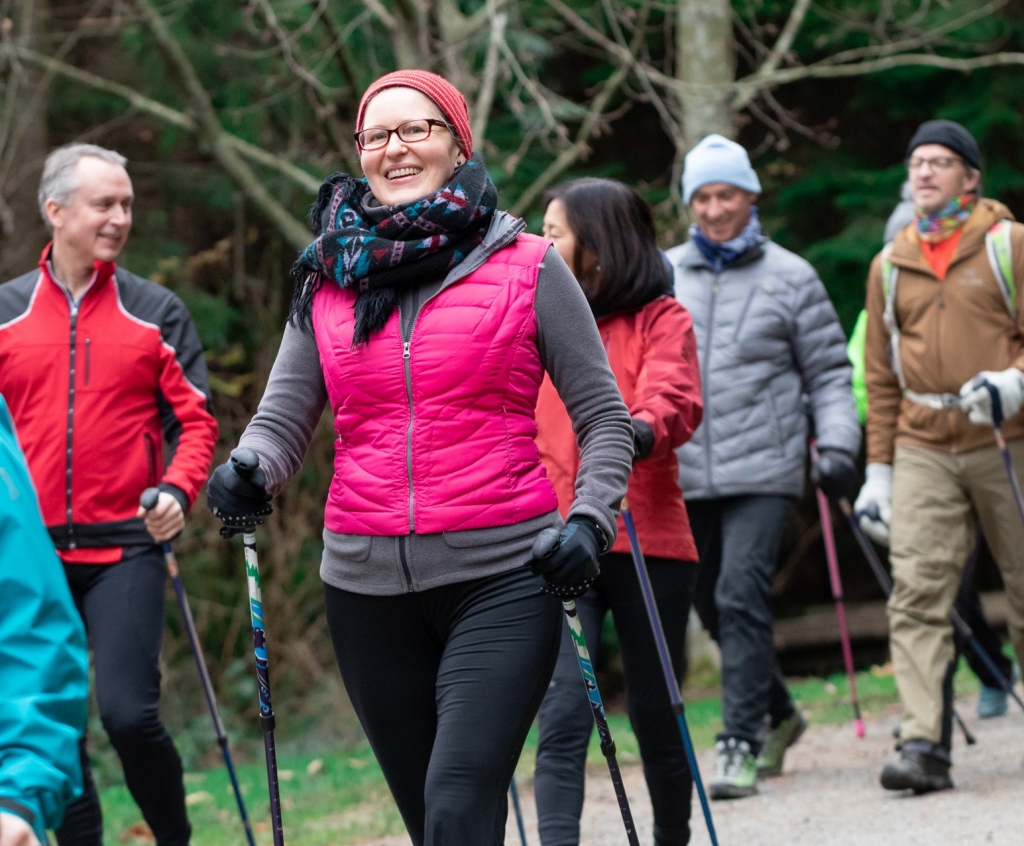
Urban Poles/Nordic Walking
Urban Poles für Fitness
Looking for a more intense workout over regular walking?
The choice is easy: same quality, design and features, all you need to decide on is your colour preference and graphics. Spirit Poles have the distinguishing features of a twist and flip locking system, and snow baskets are included.
Our Urban poles for fitness burn more calories, tone your core while taking pressure off your lower joints. Versatile for indoor and outdoor use including hiking, winter walking & snowshoeing.
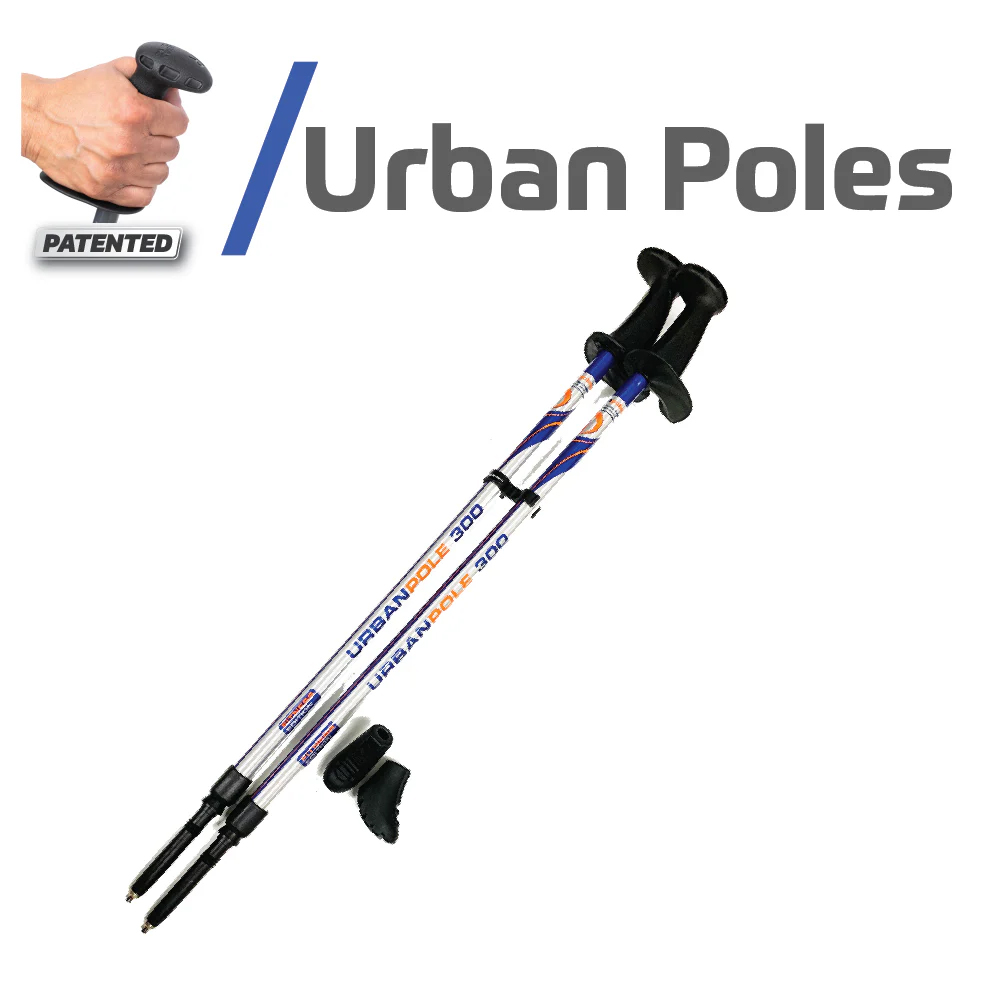
Urban Poles Series 300
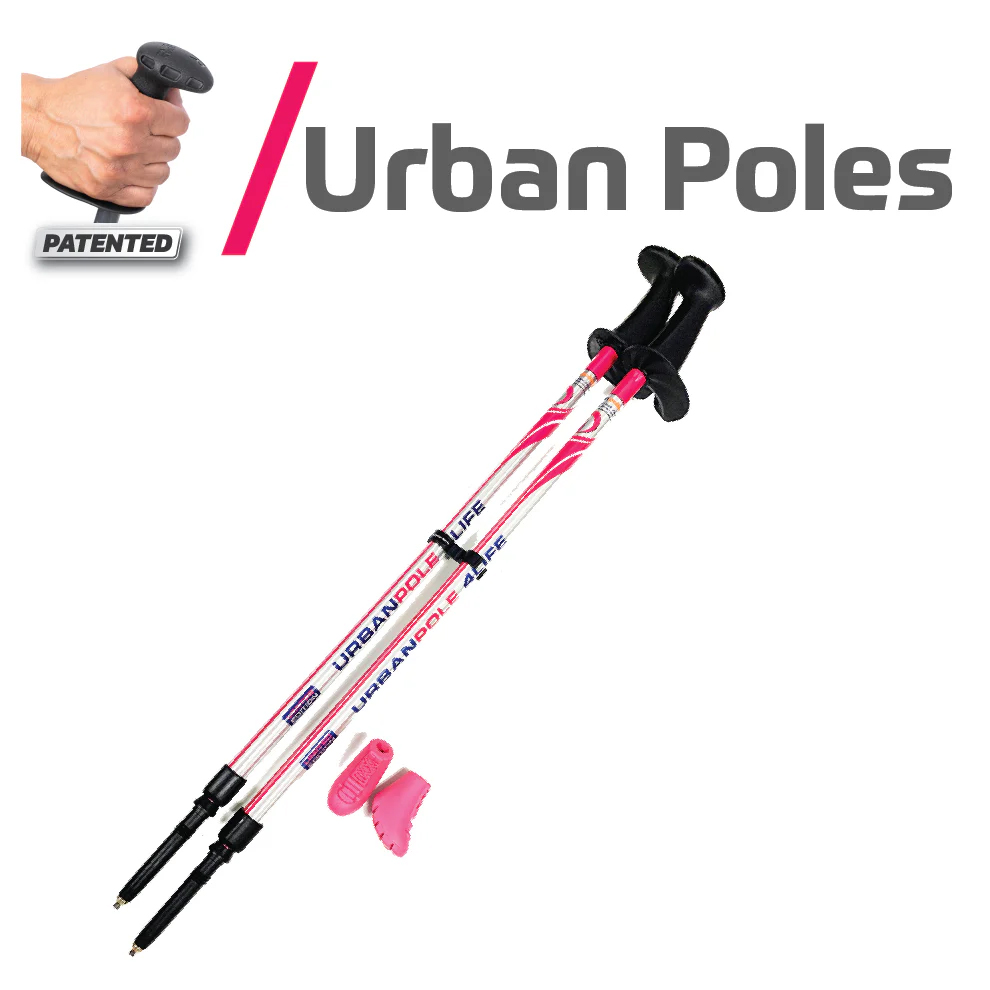
Urban Poles 4Life
Urban Poles Spirit
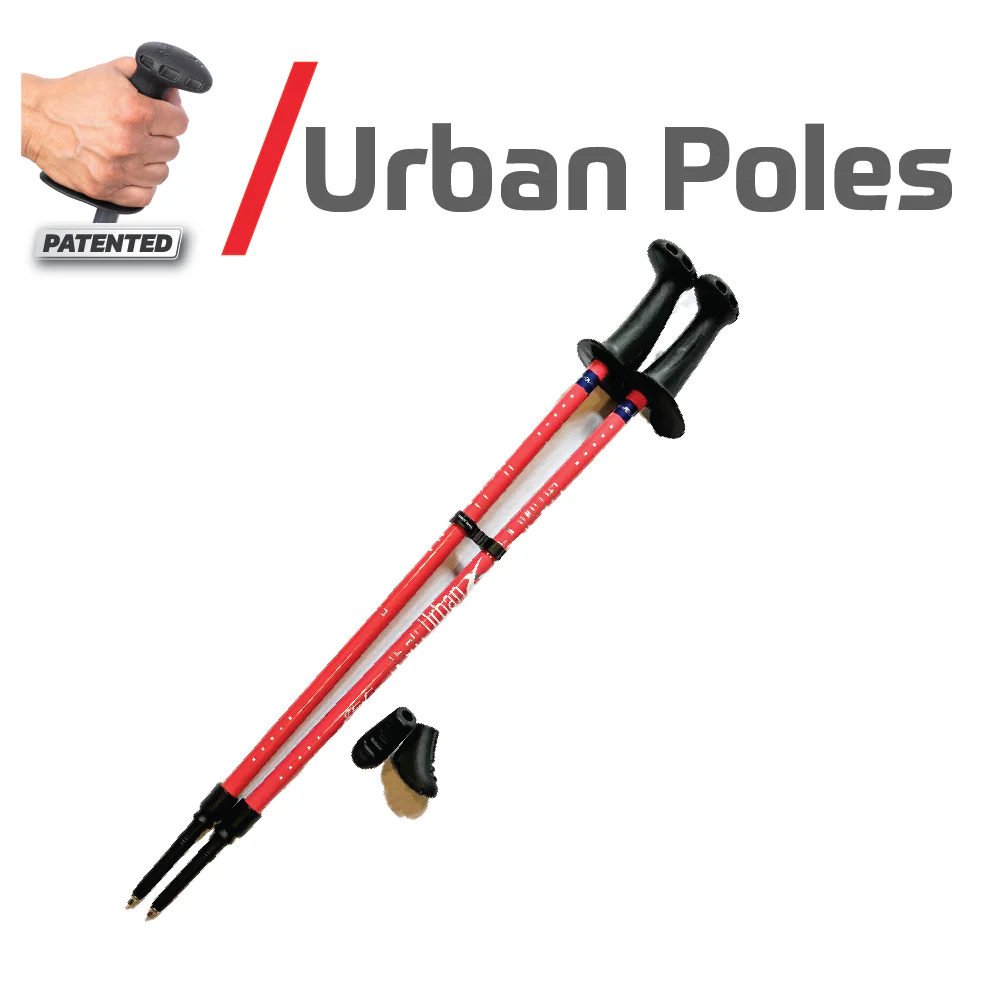
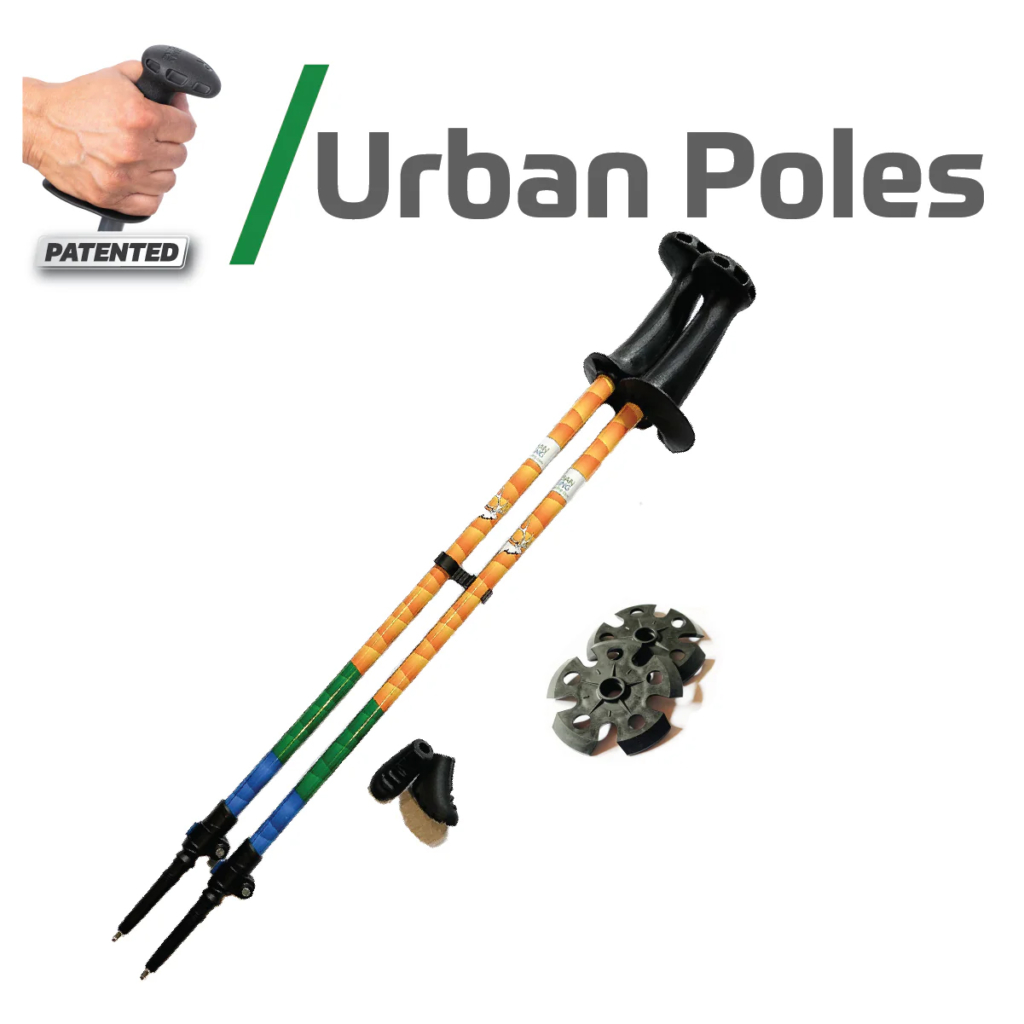
Urban Poles Urban X
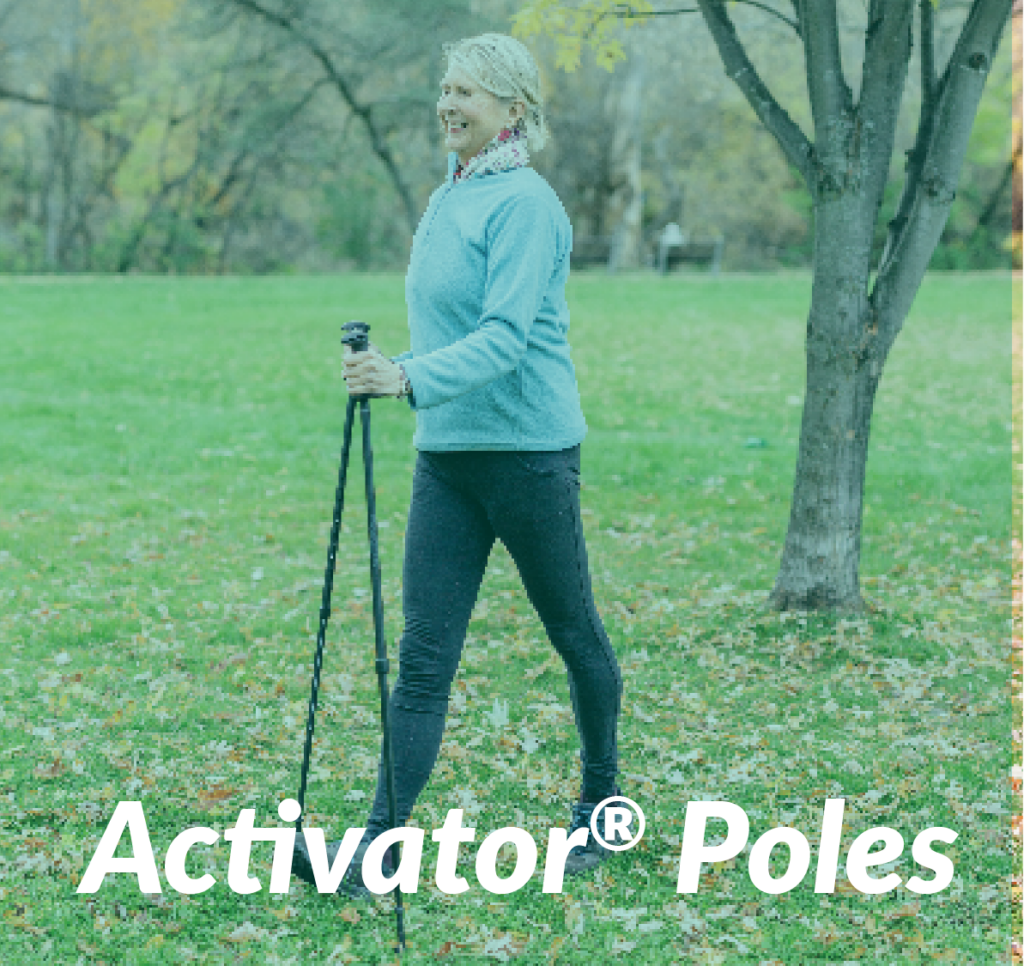
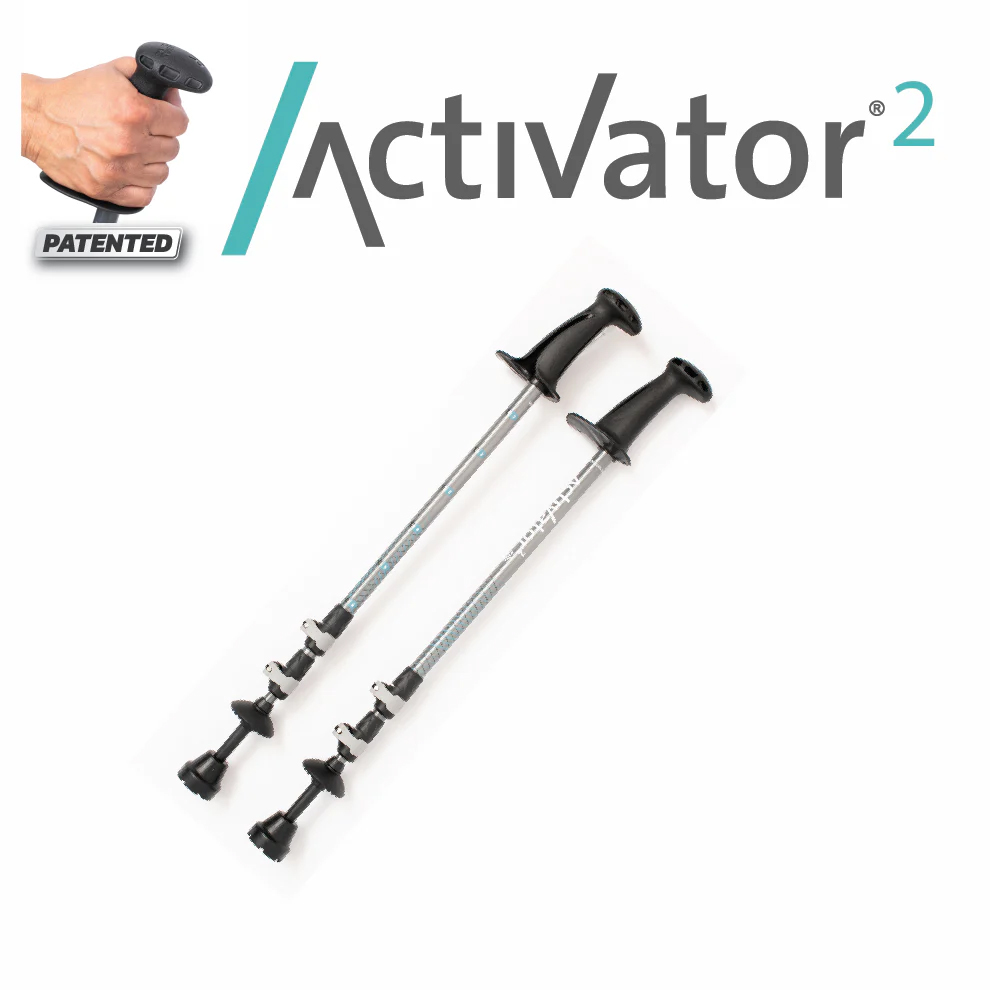
Activator® Poles - Balance and Rehab
ACTIVATOR® Poles for Balance, Hip & Knee Joints with Osteoarthritis and Rehab
The choice is easy: same quality, design and features, all you need to decide on is your colour preference. Just a note that the Moda poles include snow and hiking baskets while the Activator2s distinguishing features are that they can accommodate taller and/or heavier users and collapse to a shorter length.
Geeignet für:
- Hip and knee osteoarthritis
- Pre and post hip & knee replacement surgery
- Post spinal stenosis surgery
- Conditions that affect your balance: Parkinson’s, MS, Stroke
- Rehabilitation programs
- Older Adults Programs – Minimizing the Risk for Falls
Ask your doctor or rehab professional if ACTIVATOR® Poles are for you!
Activator® Poles - regular two sectional
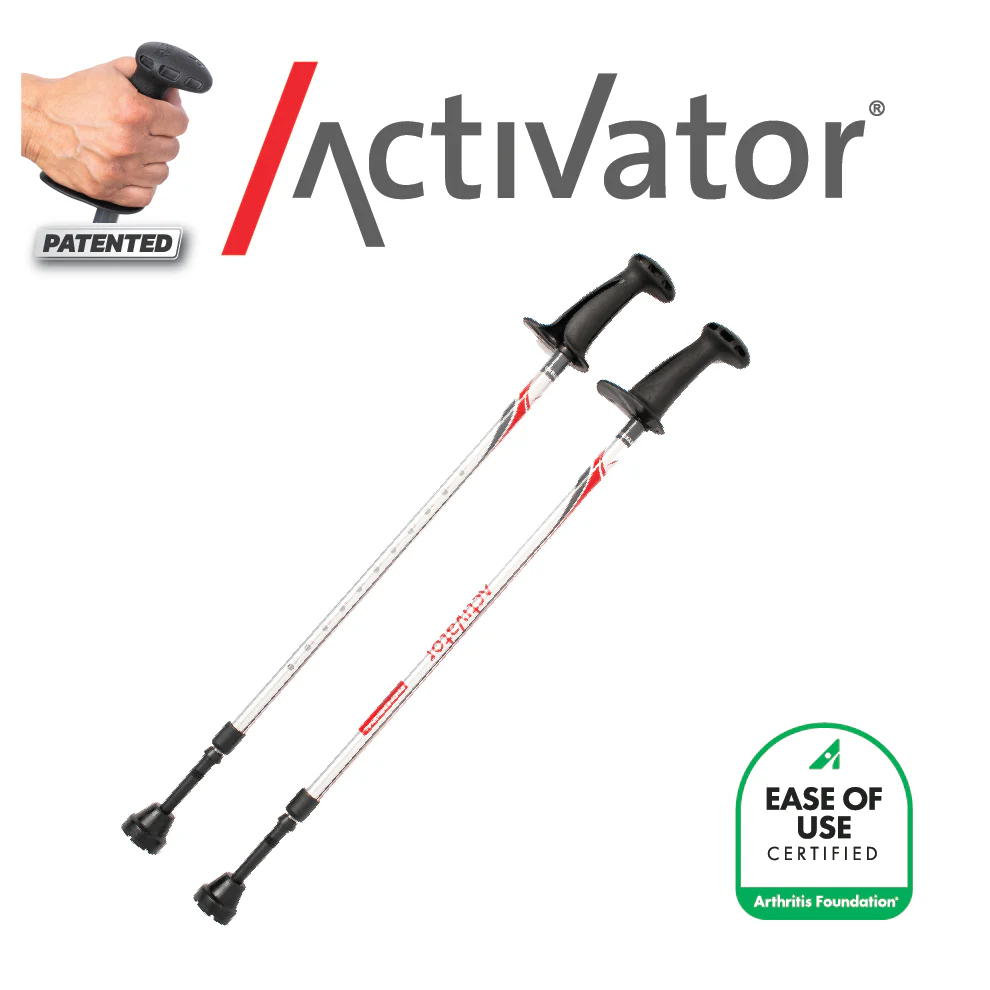
Activator Poles (Silver-Red)

Activator Evening Black
Activator Moda
Unique Components of the ACTIVATOR® Poles:
- Button-Locking System: An easier and safer method than twist locking systems. Up to 200 lbs (90 kg) of weight bearing capacity per pole. Maximum suggested user weight: 250 lbs (113 kg)
- New – Ergonomic CoreGrip (patented): Designed for improving core strengthening while providing greater comfort and supporting the wrist in a neutral position to reduce strain.
- Wide Ledge instead of a Strap: To reduce the risk of injuries. A study by Knobloch et al. (2006) found the highest rate of injury for Nordic walking is when the person is still attached to the poles during a fall.
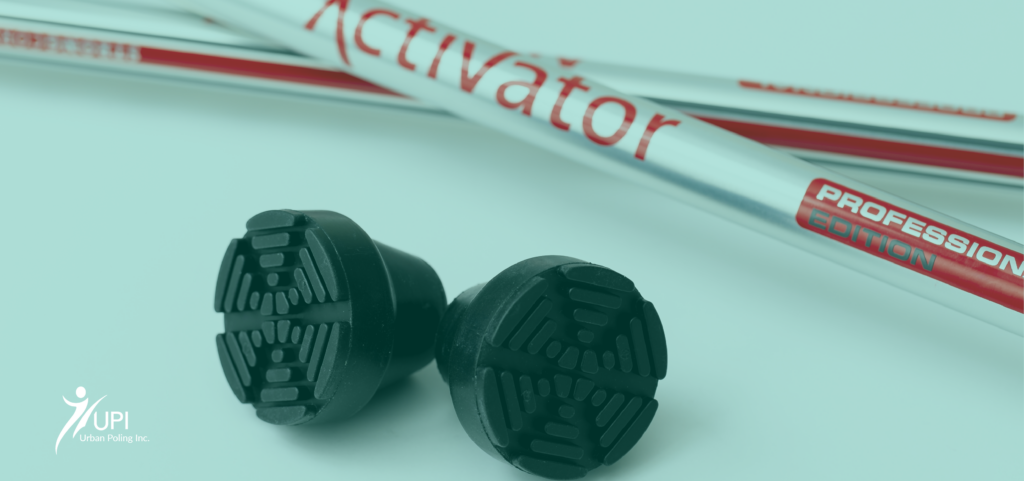
- Bell Shaped Tips: Provide greater stability than boot shaped tips
- 3 Anti-Vibration Features: The handle, ferrule and bell tips help reduce vibration and minimize impact on joints
- Carbide Steel Tip: Provides stability on soft or uneven surfaces such as sand, snow, grass, trails and gravel.
- Telescoping: For users from 4′2” to 6′ (127 to 182 cm). Collapse to 29 inches (73 cm) for storage & travel.
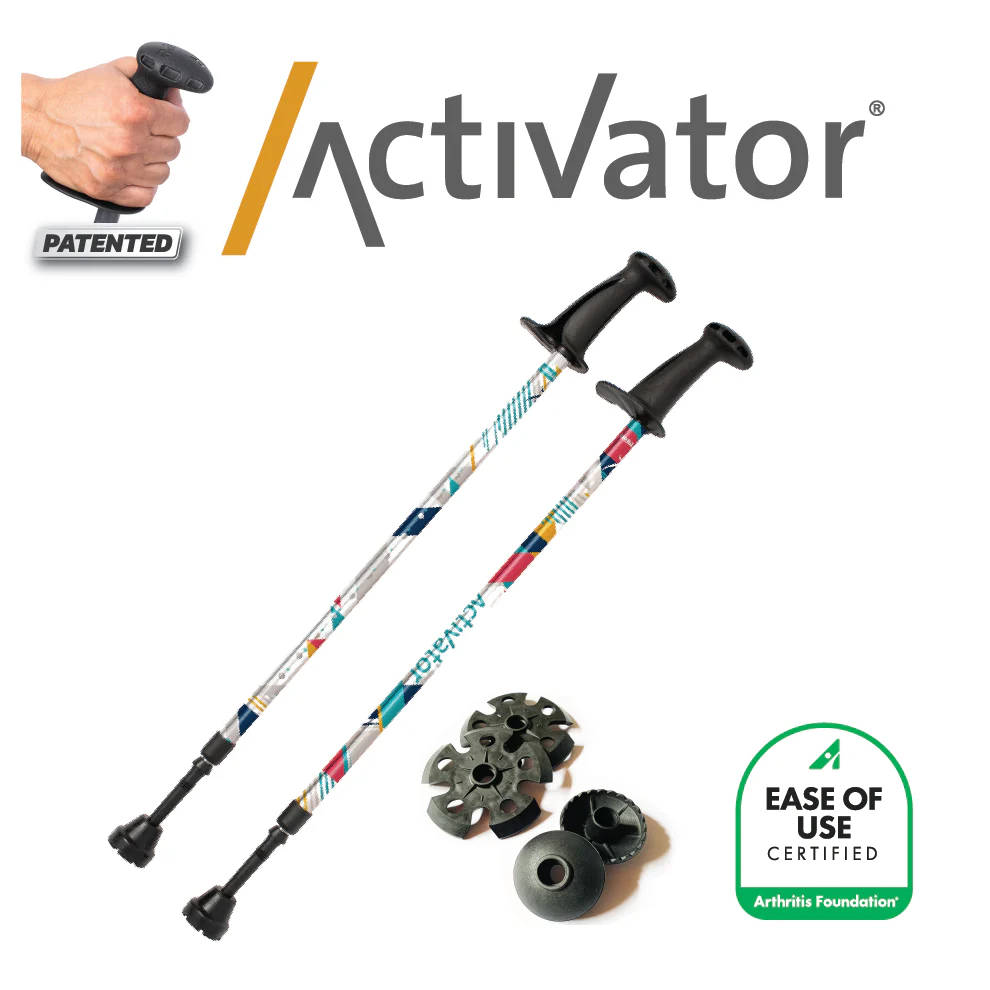
Activator® Poles 2 - special three sectional
Activator 2 Poles
have the same features as above with these differences:
- Button and flip-lock locking system: Up to 225 lbs (102 kg) of weight bearing capacity per pole. Maximum suggested user weight of 320 lbs (145 kg)
- Telescoping: For users from 4′2” to 6′4” (127 to 193 cm). Collapse to 25” (63 cm) for storage & travel
Activator 2 (3 sectional)
Activator® Anweisungen
So richten Sie Ihre Activator®-Stäbe ein
Wie man die Activator®-Technik ausführt
Activator Technique
- Step 1: Take hold of your poles
Make sure that the CoreGrip (handle) with the letter “R” is in your right hand and the pole CoreGrip with the letter “L” is in your left hand. Hold onto your poles with an easy grip, making sure your hands go all the way around the CoreGrip.
Stand tall and place your elbows at your sides at a 90-degree angle. Ensure the poles are always completely vertical. Keep your elbows bent the entire time you are walking. - Step 2: Begin walking
Step forward with the poles and walk in the same manner as regular walking: swing your right arm forward (with your elbow bent at 90 degrees) as your left foot steps forward. Keep the poles vertical and in front of your body at all times. Be sure that your upper arms swing forward and backward from the shoulders (not elbows) like pendulums. - Schritt 3: Überprüfen Sie Ihre Körperhaltung und Ihren Griff
Fassen Sie die Griffe nicht zu fest an. Drücken Sie stattdessen mit der Außenkante Ihrer Hand auf die Ledge, um Ihren Oberkörper und Ihre Rumpfmuskulatur anzuspannen und Ihre Stabilität und Ihr Gleichgewicht zu verbessern. Eine signifikante Gewichtsverlagerung auf die Stöcke findet nur statt, wenn Sie eine nach unten gerichtete Kraft auf die Ledge ausüben.Important: This technique was developed in conjunction with the specific features of the ACTIVATOR poles. A study by Bechard (2015 unpublished) at UWO found significant off-loading for the knee joint when using the Activator technique.
Schnelle Tipps
- Adapt your poles to different terrains & winter! Hidden beneath the rubber boot tip of each pole is a sharp carbide steel tip, which provides increased stability on wet and uneven terrain, such as grass, trails, gravel, sand and snow. This feature allows you to stay active all year round and is an excellent tool for helping to prevent falls in the winter time. You can also purchase snow baskets to keep the poles from sinking into the snow while winter walking or snowshoeing. To attach the baskets, take off the rubber tip and push the basket to the 3 grooves and then rotate the baskets until you achieve a tight fit.
- Using your ACTIVATOR Poles on your travels Collapse your ACTIVATOR Poles to their shortest length 29″ (79 cm) or 25″ (63 cm) for the ACTIVATOR2. They generally will fit in a medium size suitcase by placing them on a diagonal. Durable Urban Poling carrying bags are available to protect poles while in storage and in transit and makes it easy to take your poles with you. You can also use the carrying bag instead of a purse. Take the rubber tip off to expose the carbide tip for walking on trails, beaches and hikes.
- Replace your tips periodicallyYour ACTIVATOR poles come with a high-grade rubber tip for stability, off loading & reduced vibration. Replace your bell shaped tips when the treads wear out, or roughly once a year with regular use.
- Gradually Increase your time
Start by using your poles for only 1/3 of your maximum walking time and gradually increase your distance/time. - Take care of your poles
Store your poles in a dry, moderate-temperature location. You can also purchase a carrying bag for travel or storage.
Lesen Sie das Benutzerhandbuch und die darin aufgeführten Sicherheitshinweise sorgfältig durch, bevor Sie Ihre ACTIVATOR-Stöcke benutzen (das Handbuch wird mit den Stöcken geliefert).
ACTIVATOR®-Stangen
Did you know that there are 19 current/recent studies on the ACTIVATOR® Poles at hospitals and universities across Canada and at the renowned Royal National Orthopedic Hospital in the UK? Benefits may include improved core strength, posture, balance, improved confidence for walking; reduced impact on hips and knees and increased endurance! Health Care Professionals are recommending the ACTIVATOR® Poles for rehab and many conditions because they were designed by an Occupational Therapist & Gerontologist and have eight unique features for increasing safety, performance and stability. We hope you enjoy the ACTIVATOR Poles that have been built for walking and active living!
Unique Components of the ACTIVATOR® Poles:
- Button-Locking System: An easier and safer method vs turning locking systems. 200 lbs (90 kg) of weight bearing capacity per pole. Maximum suggested weight of user: 250 lbs (113 kg)
- New – Ergonomic CoreGrip (patented): Designed for improving core strengthening while providing greater comfort and supporting the wrist in a neutral position to reduce strain.
- Wide Ledge instead of a Strap: To reduce the risk of injuries. A study by Knobloch et al. (2006) found the highest rate of injury for Nordic walking is when the person is still attached to the poles during a fall.
- Bell Shaped Tips: Provide greater stability than boot shaped tip
- 3 Anti-Vibration Features: Reduce vibration and impact on joints
- Carbide Steel Tip: Provides stability on slippery conditions and on trails & beaches.
Telescoping: 4′ to 6′ (121 to 182 cm). Poles are collapsible for storage & travel - New – ACTIVATOR2 Poles designed for taller individuals up to 6′ 4″ (195 cm) and collapses shorter for travel 25″ (63 cm). Maximum user weight: 325 lbs (147 kg).
Einstellen der ACTIVATOR®-Stangen
- Wenn Sie Ihre Stöcke zum ersten Mal erhalten, müssen Sie sie auf Ihre Körpergröße einstellen.
- Step 1: Stand tall with your poles upright and relax your arms so that your elbows rest at a 90-degree angle. This is the correct pole length for your height.
- Step 2: Notice the perforated holes on the top portion of the pole. Pull the bottom portion of the pole downward and turn it until the silver stripe lines up with the holes. Continue to pull down on the lower part of the pole until the button pops into the correct hole for your height. You may need to adjust the pole slightly up or down before the button locks securely into place.
Einstellen der ACTIVATOR® 2-Stangen
- Extend poles: Open both flip-locks tabs (grey). Pull below flip-lock to extend the middle and lower sections. Lower section may be stiff to pull initially.
- Set pole length: Adjust the pole length so that you can stand with your elbow bent at slightly less than a 90 degree angle with your hand resting on the ledge of the CoreGrip and the bell tip resting on the ground.
- Secure button lock A-B: Looking at holes A and B in the middle section, turn the lower section of the pole until you see the white stripe in the holes marked A and B. Pull on the lower section of the pole until the button locks into hole A or B.
- Secure button lock 1-6: Repeat above securing the button lock in one of the holes marked 1-6 (depending on appropriate level for your height) in the upper section. Confirm pole length and close flip-lock tabs. Collapsing: open the flip-lock tab, push the button lock and at the same time push in the section Close flip-lock tab.
Wie Sie Ihren Activator® 2 einstellen
Vorsichtsmaßnahmen:
Konsultieren Sie Ihren Arzt, Therapeuten oder eine andere medizinische Fachkraft, bevor Sie die Stöcke benutzen, wenn Sie derzeit einen Stock, Krücken oder eine Gehhilfe benutzen, wenn Sie trainieren, wenn Sie gesundheitliche Probleme haben, die Ihr Gleichgewicht, Ihre Stabilität, Ihre Fähigkeit, die Griffe zu greifen, Ihr Sehvermögen, Ihre Tiefenwahrnehmung oder Ihre Koordination beeinträchtigen, oder wenn Sie sich gerade von einer Verletzung oder Operation erholen.
- DO NOT use the ACTIVATOR Poles on stairs unless trained by a therapist or other health care professional.
- ACTIVATOR Poles should not be used on ice.
Always use both poles (except for people with strokes), unless advised otherwise by your healthcare professional. - ACTIVATOR Poles may help to prevent or break a fall, but falling on them may affect pole integrity. Do not use poles that have been fallen on or that have been damaged in any other way.
- Replace your poles approximately every 2 years if you are over 200 lbs (90 kg) or a heavier user. Use exceeds more than 5-10 km per week.
- Ask your therapist how to use the poles for transferring out of the car and use both poles.
Einführung in Urban Poling
Sind Sie neugierig auf das Walking-Workout mit dem Stock? Urban Poling (auch bekannt als Nordic Walking) - denken Sie an Skilanglauf ohne Skier - hat Vorteile für den Muskelaufbau, die Kalorienverbrennung und die Körperhaltung, die es in Europa seit Jahrzehnten populär und in Kanada zu einem neuen Lieblingstraining gemacht haben. Schnappen Sie sich einfach Ihre Stöcke und los geht's - Sie brauchen weder ein teures Spandex-Outfit noch eine Mitgliedschaft im Fitnessstudio!
Hier sind 10 weitere Gründe, Urban Poling auszuprobieren.
- 1. Es verkleinert Ihre Taille - Ihre Bauchmuskeln straffen sich jedes Mal, wenn Sie sich mit Ihren Stöcken abstoßen. Das entspricht 1.000 Bauchmuskelkontraktionen pro Kilometer oder 1.800 pro Meile!
- 2. Ihre Knie und Hüften werden es Ihnen danken - Mit den Stöcken können Sie das Gewicht von Ihren Hüften und Knien auf Ihren Oberkörper verlagern. Sie können weiter, schneller und sogar schmerzfrei gehen.
- 3. Es kurbelt die Kalorienverbrennung an - Die Forschung beweist es immer wieder: Beim Urban Poling werden bis zu 20 bis 46 % mehr Kalorien verbrannt als beim normalen Gehen. Wahnsinn!
- 4. Es formt Ihre Arme und Schultern - Urban Poling beansprucht 75 Prozent Ihrer Muskeln, vor allem die wenig beanspruchten Oberkörpermuskeln. Hallo kurze Ärmel!
- 5. Es hilft, den Blutzuckerspiegel auszugleichen - Das Ganzkörpertraining beim Urban Poling hilft, den Blutzuckerspiegel in einem gesunden Bereich zu halten.
- 6. Sie richten sich auf und fühlen sich selbstbewusster - Ihre obere Rückenmuskulatur (die Muskeln, die Ihre Schultern nach hinten ziehen) spannt sich jedes Mal an, wenn Sie Ihre Stöcke aufstellen und die ergonomischen Griffe nach unten drücken.
- 7. Es ist ein geselliges Training, das Spaß macht - laden Sie Ihre Freunde, Eltern und Kinder ein, um mit Ihnen die gesundheitlichen Vorteile zu genießen.
- 8. Es ist ein erstaunlicher Stresskiller - Die sanfte, rhythmische Bewegung lenkt von den Alltagssorgen ab und hebt die Stimmung.
- 9. Sie können die Intensität einstellen - Urban Poling ist eine anregende Aktivität, die von Menschen jeden Alters und jeder sportlichen Fähigkeit ausgeübt werden kann. Drücken Sie einfach auf die ergonomischen Griffe mit mehr oder weniger Intensität, um Ihr Tempo zu ändern.
- 10. Eine großartige Alternative zum Laufen - Gehen Sie allein oder mit einer Gruppe von Freunden auf die Wanderwege oder Bürgersteige in Ihrer Nachbarschaft. Urban Poling bietet das ganze Jahr über dasselbe Frischlufterlebnis wie Laufen - nur ohne Erschütterungen und Stöße für die Gelenke.
Wie Sie Ihre Stadtmasten aufstellen
Serie 300, 4Life und UrbanX.
Wie man die Urban Poling Technik durchführt
Serie 300, 4Life, UrbanX und Spirit Stöcke
Einstellen des Pols
Wenn Sie Ihre Stöcke zum ersten Mal erhalten, müssen Sie sie auf Ihre Körpergröße einstellen. Die Stöcke haben ein internes Drehverschlusssystem, das bis zu 41 kg (90 lbs) direktem Druck pro Stock standhält. Empfohlenes Maximalgewicht des Benutzers: 102 kg (225 lbs). Auf dem unteren Teil der Stöcke befinden sich Markierungen, die von 4′-2" bis 6′-2″ (128 bis 189 cm) reichen. Wenn Sie ein Anfänger oder neu im Polosport sind, finden Sie es vielleicht einfacher, mit Stöcken zu beginnen, die 5 cm (2 Zoll) unter Ihrer Körpergröße eingestellt sind.
Schritt 1: Suchen Sie die Aufschrift "lock/unlock" auf dem unteren Teil der Stange. Legen Sie Ihre linke Hand auf den oberen Teil der Stange und Ihre rechte Hand in die Nähe des unteren Teils der Stange. Drehen Sie nur den unteren Teil in die Position "Entriegeln". Berühren Sie NICHT die schwarze Kunststoffhülse in der Mitte des Stocks - dies ist eine Anti-Vibrationsfunktion.
Schritt 2: Nachdem Sie die Stange auf Ihre Höhe eingestellt haben, ziehen Sie sie wieder fest, indem Sie nur den unteren Teil der Stange in Richtung der "Verriegelungsposition" drehen. Vergewissern Sie sich vor dem Gebrauch immer, dass die Stöcke sicher verriegelt sind. Ziehen Sie die Stöcke niemals über die Worte "Max" oder "Stop" hinaus und verriegeln Sie sie nicht.
Schritt 3: Achten Sie darauf, dass die "Spitze" des Stiefels hinter Ihnen oder in die entgegengesetzte Richtung zeigt, in die Sie gehen.
Wie Sie Ihre Geisterpfähle aufstellen
Hinzufügen von Schneekörben zu Ihren Stadtmasten
Urban Poling Technik
Bevor Sie beginnen, sollten Sie die Länge der Stange auf Ihre richtige Höhe einstellen.
Schritt 1: Beobachten Sie, wie Sie natürlich gehen
Gehen Sie ein paar Schritte vorwärts ohne Ihre Stöcke (oder während Sie Ihre Stöcke in der Mitte halten) und schwingen Sie Ihre Arme so, wie Sie normalerweise gehen würden. Achten Sie darauf, dass sich Ihr Arm gleichzeitig mit dem anderen Bein nach vorne bewegt.
Schritt 2: Ziehen Sie Ihre Stangen
Nehmen Sie Ihre Stöcke in die Hand. Achten Sie darauf, dass der CoreGrip mit dem Buchstaben "R" in der rechten Hand und der CoreGrip mit dem Buchstaben "L" in der linken Hand liegt. Fassen Sie die Griffe der Stöcke locker an, wobei Ihre Arme völlig entspannt an der Seite hängen. Mit den Armen an der Seite und den Stöcken hinter sich herziehend, beginnen Sie einfach zu gehen. Spüren Sie, wie Ihre Arme bei jedem Schritt leicht vor und dann hinter Ihren Körper schwingen.
Schritt 3: Schwingen Sie Ihren Arm in die Handschlagposition
Wenn Sie weitergehen und Ihre Stöcke ziehen, schwingen Sie Ihre Arme weiter nach vorne, bis sie sich auf gleicher Höhe befinden, als ob Sie einen hohen Händedruck geben würden. Wenn Ihnen das schwerfällt, verkürzen Sie die Länge Ihrer Stöcke. Jetzt sollten Sie spüren, dass die Spitzen der Stöcke bei jedem Schritt den Boden hinter Ihnen berühren.
Schritt 4: Nach unten drücken und abdrücken
Während Sie Ihre Stöcke aufstellen, drücken Sie die Kante des CoreGrip nach unten und spüren, wie Ihr Körper von den Stöcken nach vorne geschoben wird. Wenn Ihr Arm schließlich nach vorne in die hohe Handshake-Position schwingt, heben Sie ihn leicht an, damit Ihre Stöcke den Boden verlassen können.
Das ganze Jahr über Urban Poling!
Genießen Sie Ihre Urban Poles das ganze Jahr über beim Winterwandern und Schneeschuhlaufen! Sie können auch Korbaufsätze für die Series 300, 4Life oder Spirit Stöcke und ACTIVATOR Stöcke kaufen: Schneekörbe für Winterspaziergänge und Trekking-Körbe für Wanderungen.
Teil 1: Die Grundlagen
Schnelle Tipps
Fassen Sie die Griffe leicht an
Der ergonomische CoreGrip (Griffe) ist so konzipiert, dass er leicht gehalten werden kann. Bemühen Sie sich stets um einen entspannten Griff (mit den Fingern ganz um die Griffe herum), um unnötige Spannungen in Ihren Händen zu vermeiden. Das Training wird durch einen Druck nach unten auf die Kante des CoreGrip ausgelöst, während Sie Ihren Arm nach hinten schwingen, um Ihre Rumpfmuskulatur zu aktivieren.
Passen Sie Ihre Stöcke an unterschiedliche Geländeformen an
Unter der Gummistiefelspitze jedes Stocks verbirgt sich eine scharfe Karbidstahlspitze, die auf nassem und unebenem Terrain wie Gras, Kies, Sand und Schnee für mehr Stabilität sorgt. Dies ist ein großartiges Hilfsmittel, um Stürze im Winter zu vermeiden.
Ersetzen Sie Ihre Spitzen regelmäßig
Ihre Urban Poling Fitnessstöcke sind mit einer hochwertigen Gummispitze ausgestattet, die für bessere Traktion, höhere Geschwindigkeit und geringere Vibrationen sorgt. Ersetzen Sie Ihre Schuhspitzen, wenn das Profil abgenutzt ist, also etwa alle sechs Monate oder jährlich, je nach Häufigkeit der Nutzung.
Verwendung der Stöcke bei sehr kalten Temperaturen
Wenn Sie die Stöcke bei Minusgraden verwenden, stellen Sie die Stöcke 10-15 Minuten ins Freie, damit sie sich an die Temperatur anpassen können. Verriegeln Sie sie dann in der gewünschten Höhe.
Trick zum Entriegeln der Stangen
Die Stöcke verfügen über ein ausgezeichnetes Verschlusssystem, aber bei neuen Stöcken kann das Entriegeln bei den ersten Malen schwierig sein. Versuchen Sie dies: Drehen Sie die Stöcke auf den Kopf und halten Sie den Griff fest zwischen Ihren Füßen. Drehen Sie dann den unteren Teil mit beiden Händen kräftig in Richtung "Entriegeln".
Pflegen Sie Ihre Stöcke
Lagern Sie Ihre Stöcke an einem trockenen Ort mit moderater Temperatur. Verwenden Sie niemals Schmiermittel jeglicher Art. Sie können auch unsere einzigartige und stilvolle Tragetasche für Reisen und Lagerung kaufen.
Vorsichtsmaßnahmen:
Konsultieren Sie Ihren Arzt oder Therapeuten, bevor Sie die Stöcke benutzen, wenn Sie derzeit einen Stock oder eine Gehhilfe benutzen, an einer Krankheit leiden, die Ihr Gleichgewicht, Ihre Stabilität, Ihre Griffstärke, Ihr Sehvermögen, Ihre Tiefenwahrnehmung, Ihr Urteilsvermögen oder Ihre Koordination beeinträchtigt, oder wenn Sie sich gerade von einer Verletzung oder Operation erholen.